
How To Update The Software
You can read the steps below to see how you can update the software. If you want to print this guide to keep beside you while performing the actions, you can download the file below.

How To Update The Software
Step 1
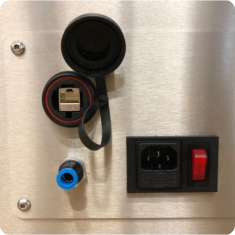
Connect your computer/ laptop to the Oxipack leak tester with an ethernet cable. (Remove the dust cover on the back of the leak tester and plug the ethernet cable in the port).
Step 2
Plug the provided Oxipack USB in an open USB slot in your computer/ laptop.
Step 3
The standard IP Address the controller uses is: 192.168.1.1 The IP address of your Computer/ Laptop should be set to 192.168.1.x. On the x mark use a number that is higher then the last number of the controllers IP address.(if you have a different IP address for example 172.45.21.150 your computer/ laptop has to be set in that range. For example, the IP address of your computer/ laptop has to be set to 172.45.21.160 As you can see the last number is higher than the IP address of the controller). Please follow next steps to set the IP Address of your laptop.

Step 3.1
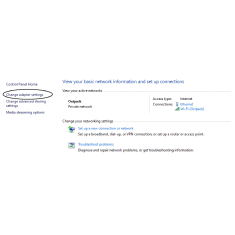
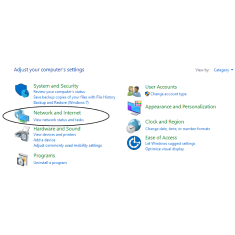
Open the control panel and navigate to “Network and Internet”. And press “View network status and tasks”.
Step 3.2
Press on the button “Change adapter settings”.
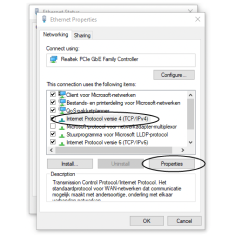
Step 3.3
Double click on the “Ethernet” adapter.
Step 3.4
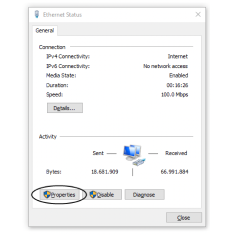
Press “properties” button.
Step 3.5
Select the “Internet Protocol version 4 (TCP/IPv4)” option and press “Properties”.
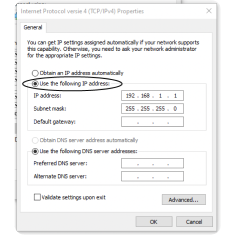
Step 3.6
Set the selection to “Use the following IP address” and fill in the correct IP Address as described in Step 3, for example we used the standard IP address. When everything has been filled in, press the OK button. Your computer/ laptop has now been set in the correct IP range.
Step 4
Open the Oxipack USB and browse for the “Data Retrieve” folder. Open the folder and double click “Filezilla.exe”.
Step 5
Fill in the correct IP Address and username. Host = IP Address of the controller (For example 192.168.1.1) Username = cms-admin and the Password = cms-system. Press the Quickconnect button to connect to the leak tester.
Step 6
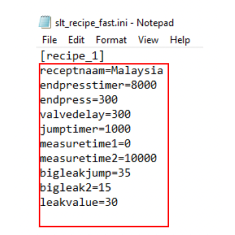
Right-click the “slt_recipe_fast.ini” or “slt_recipe_standard.ini” file and select “view/edit”.
Step 7
If you would like to add a recipe, copy the first recipe and change the name. Change the number ‘[Recipe_1]’ Into the next available number. Change the name of the recipe (Malaysia) to the desired name. (this name will appear on the display when selecting a different recipe). If you would like to change parameters this can be done over here. Keep in mind that the leak testers needs to be rebooted in order to load the adjusted recipies.
Step 8
Save the recipe and close the text editor. A pop-up in fillezilla will appear asking if you would like to upload the changes to the leak tester. Press ‘Yes’.
Step 9
Reboot the leak tester.